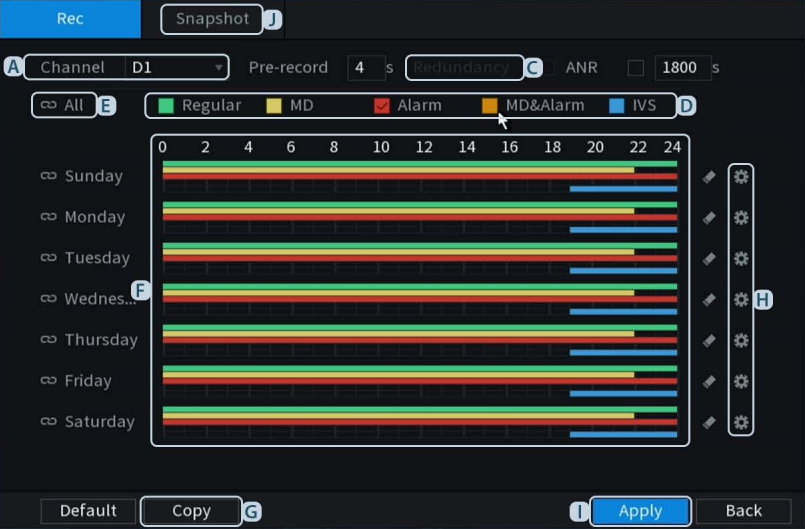
Setting the Recording Schedule
The NVR will have a default recording schedule of 24/7 recording on all channels indicated by a green line for each day of the week. If you wish to change or customize your recording schedule you need to go to the Main Menu > select Storage under Management on the bottom row > and then choose Schedule from the left-hand column.
If you wish to only record motion events then you will remove the green line and replace it with a yellow line. Yellow indicates motion.
If you have both a yellow line and a green line then you will be recording 24/7 as well as motion events.
Recording schedules are configured for each channel ( camera) individually. However, you can also choose to copy these settings to all channels.
A) The Channel Dropdown will let you choose the camera you want to set the schedule for (or choose all).
B) Pre-Record can record footage a few seconds before the event occurs.
C) Redundancy allows you to record footage to multiple hard drives for backup (Only available with multiple hard drives).
D) Using the Check the boxes will allow you to manually draw or erase lines for the selected record type ie .yellow for motion, green for 24/7 blue for IVS. To do this you will simply check to mark the color box for the type of recording you wish to modify. Once checked you can then click-drag across the colored lines for each day. If the line already exists you will be erasing it. If the line does not exist you will be creating it.
E) Click the box for All this will link all of the days together. So when you are drawing your lines it will draw the same line for all of the days. If this is not linked then you will only be modifying one day at a time.
F) Click and drag on the Timeline to paint the schedule for the recording type you chose. Repeat this for all recording types you wish to use
G) To copy the recording schedule to other channels select Copy at the bottom and select the channels
H) The Gear Icon will allow you to break each day’s recording into different ‘periods’ (uncommon)
I) When the schedule is complete choose Apply.
J) Repeat for Snapshot to set the schedule for still images (uncommon).

Still have questions? Contact us.
